Monitoring Schedules
The Schedule Monitor is available as soon as a Schedule has started. It provides detailed information on the progress of the Schedule and of the executions of its sub tasks. It allows you to modify some parameters in the Schedule object definition, most of the properties of the tasks as well as to add tasks at runtime.
This topic provides information on the following:
- Overview
- Accessing the Schedule Monitor
- Task List
- Using the Toolbar
- Viewing the Details of the Tasks
- Modifying the Schedule Definitions from the Monitor
You can monitor any executed Schedule or a child object of an executed Schedule that you are authorized to work with. Authorizations and permissions are set in your user definition.
As long as a Schedule and its tasks are active, you can change some of the Schedule settings and of the properties of its tasks. These changes apply to that particular execution. If you want those changes to be permanent, you have to change the Schedule definition. See Defining Schedule Objects. As soon as the Schedule has finished, the original settings apply again.
The Schedule Monitor is available as long as the Schedule remains in the Tasks list, also after it has ended. You can also use the Schedule Monitor to re-execute particular tasks.
During the execution of a Schedule, its Monitor is dynamic. By default, it refreshes every 60 seconds to provide the latest information on the status of its tasks. If necessary, you can change the refresh interval in your user settings, see Specifying the Refresh Interval in the Process Monitoring Perspective.
Accessing the Schedule Monitor
You can access the Schedule Monitor from the following spaces in the system:
- Process Assembly perspective
- Process Monitoring perspective
- My Catalog perspective
- Dashboards perspective
- In the Global Search dropdown list
Right-click the Schedule object or task and select Last Monitor (Process Assembly and Global Search list) or Open Monitor.
Tasks contained in a Schedule object are listed on the Monitor sorted by start times. Tasks with the same start time are sorted alphabetically by name.

The columns on this table provide the following information:
| Column | Description |
|---|---|
| Task Name | Name of the task. Not editable. |
| Type | Abbreviation that indicates the type of task. Not editable. |
| RunID | Unique identifier assigned to the task upon execution. Not editable. |
| Status |
Current status of the task. During the execution of a Schedule, the monitor is dynamic; by default, it refreshes every 60 seconds to provide the latest information on the status of its tasks. If necessary, you can change the refresh interval in the Schedule Monitor. See Specifying the Refresh Interval in the Process Monitoring Perspective. |
| Scheduled Check | Time and date on which the system will check if the task should be started. Not editable. |
| Next Start Time |
Time and date on which the task will presumably be executed. This point in time depends on the period that has been specified in the Schedule and on the defined calendar conditions. CALE_LOOK_AHEAD_MAX is displayed here if the calculated start time lies beyond the period that the administrator has defined in the UC_CLIENT_SETTINGS variable. This information is also displayed if the calendar event is no longer valid or available. The task switches its status to FAULT_OTHER - Start impossible. Other error in such a case. To modify this setting
|
| Active | In edit mode you can activate/deactivate tasks directly in this column. |
| Start Time |
In edit mode you can modify the start time. This is the time at which this task will be executed. The default value is the time that has been defined in the Period Turnaround Time field on the Schedule Attributes page. |
| Start Offset (days) |
In edit mode you can change the number of days. You use this field in combination with the period duration and turnaround time. This field specifies the number of days that should elapse between the beginning of a period and the activation of the selected task. |
| Calendar Conditions Set |
A tick indicates that a calendar has been assigned to the task. Purpose/Background The period duration and the task start offset parameters of the Schedule may cause tasks to be executed on dates that should rather be avoided because they are non-working days, for example. Or maybe the task should be executed only in some of the days that result from those settings. Calendars can be assigned to tasks in a Schedule to solve these problems. Not editable. |
| Runtime Settings Overridden |
When creating an object, on the Runtime Page you define the parameters to calculate the maximum and minimum runtimes of tasks and, in case of deviations, you specify what should happen. A Schedule object can override these definitions for the execution of its tasks. A tick indicates that the task has specific runtime definitions for this schedule. Not editable. |
| Result Check |
A tick indicates that a follow-up action has been defined for the task depending on its status after execution. Not editable. |
During the execution of a Schedule, the monitor is dynamic; by default, it refreshes every 60 seconds to provide the latest information on the status of its tasks. It is possible to change the refresh interval of the Schedule Monitor in the Session and User Settings.
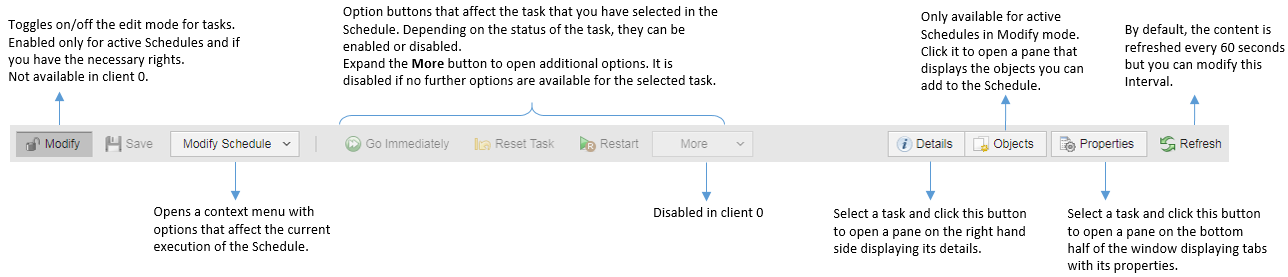
The toolbar provides shortcuts for all the functions available for the Schedule and its tasks:
Viewing the Details of the Tasks
Select a task and click  on the toolbar to open a pane on the right hand side of the page displaying all the details on the task.
The information is provided in collapsible sections that vary depending on the type of task you have selected. For example:

See also: